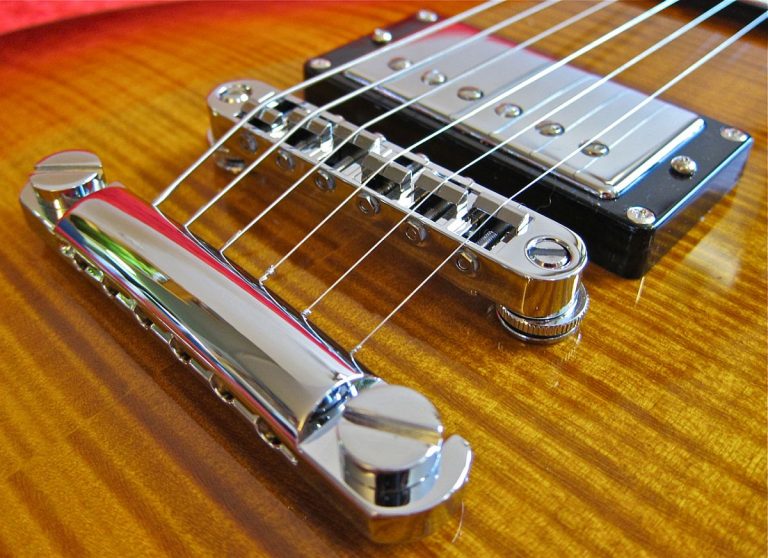
How to Convert a Gibson Nashville Bridge to ABR-1 Style
To convert a Gibson Nashville bridge to ABR-1 style, you replace the stock one-piece Nashville posts with Faber conversion posts and fit a Faber ABRN or Tone-Lock bridge on them. FaberUSA sells the ABRN, the Tone-Lock bridge and Tone-Lock Master Kits together with your choice of posts: NSWKIT “E-Z” (no modification), iNsert “Plus” (bushings replaced) or BSWKIT “Pro” (professional installation recommended).
Step 1: Confirm you have a Nashville bridge
You’ll find the Nashville bridge on many Gibson USA models, including Flying V, Explorer, Firebird and Les Paul Classic, and on non-Custom Shop Les Pauls. Heritage guitars with Schaller bridges use essentially the same system.
Look at the height adjusters:
- Nashville: the post and thumbwheel are one piece, threaded only at the bottom, and screw into a metal bushing pressed into the body. There are no threads above the thumbwheel, and the post tops are smooth.
- Original ABR-1: thin 6-32 posts screwed straight into the wood, threaded along their full length, with a separate thumbwheel that rides up and down the thread. These guitars don’t need a conversion.
- USA/ABR-1 (2017 and later): an ABR-1 bridge sitting on one-piece posts in body bushings. It’s used on the Les Paul Traditional, some 2017–2019 Les Paul Standard and Classic models, 2019-on Original Collection Les Paul Standards, the SG Standard ’61 and the ES-335/345. This page doesn’t apply to those guitars. Use ABR-1 Bridge on a USA Gibson and Faber’s “EZ” USA/ABR-1 posts or “PLUS” USA/ABR-1 posts instead.
Not sure? See the Nashville vs ABR-1 comparison and the FAQ, or send photos through the Sales & Tech Support form.
Step 2: Choose your bridge
Every option below ships with conversion posts, which you pick in Step 3.
ABRN (non-locking)
The ABRN, from the ABR-59 line, is an ABR-1 sized bridge for Nashville and Schaller systems. It’s narrower than the stock Nashville bridge, so it has the vintage look and lets you set the tailpiece lower without the strings touching the back of the bridge. It has no saddle retaining wire, a 12″ saddle radius, and pre-notched saddles as standard (unnotched saddles are optional). Choose it as the ABRN “E-Z”, ABRN “Plus” or ABRN “Pro”, or browse ABRN Bridge with Conversion Bridge Posts.
Tone-Lock bridge (locking)
The Tone-Lock bridge locks onto the threaded conversion posts with a pair of 4mm lock nuts instead of set screws, so it stays on the guitar during string changes. The frame comes in the original aluminum alloy or optional machined bell brass. Choose the Tone-Lock “E-Z” (NSWKIT), Tone-Lock “Plus” (iNsert) or Tone-Lock “Pro” (BSWKIT). A Lock Nut/Tailpiece Stud Tool is included.
Tone-Lock Master Kit (bridge + tailpiece + studs)
A Tone-Lock Master Kit combines the Tone-Lock bridge, conversion posts, lock nuts, a TP-’59 lightweight aluminum stop tailpiece, and Tone-Lock INCH (5/16-24) locking tailpiece studs and spacers. Options are Master Kit “E-Z”, “Plus” and “Pro”. USA-made Gibsons use inch tailpiece studs. The Gibson Nashville Master Kits also suit Heritage guitars with Schaller bridges only if the guitar has imperial tailpiece bushings. Heritages with metric tailpiece bushings need a Master Kit for Heritage (for example #6000 “E-Z”).
Step 3: Choose your conversion posts
| Posts | What it replaces | Modification level |
|---|---|---|
| NSWKIT “E-Z” | One-piece post/thumbwheel only; threads into your existing bushings | None |
| iNsert “Plus” | Bushing and post, replaced by a one-piece bell brass stud with separate thumbwheel | Bushings removed; check hole depth |
| BSWKIT “Pro” | Bushing and post, replaced by a steel stud with separate thumbwheel | Professional installation recommended |
NSWKIT “E-Z”: no modification
The NSWKIT (#3051) replaces the stock one-piece post and thumbwheel with a steel post (M5 x .8 lower thread, M4 x .7 upper thread) and brass thumbwheel. It threads into your existing bushings, which stay in the guitar. It’s the simplest of the three options and needs no tools or special skills.
iNsert “Plus”: new bushing and post in one
The iNsert (#3116) replaces both the zinc-alloy Nashville bushing and the post. It’s a one-piece German bell brass stud with a flange that sits flush on the top. A separate machined brass thumbwheel rides on a 4mm threaded upper post, like an ABR-1 system. Each set includes a metal installation tool and a 5mm bolt for pulling the old bushings. Faber describes it as moderately easy to install, and there’s an installation video on the product page. Faber says the original holes are almost always deep enough, but occasionally one is too shallow for the flange to sit flush. Measure first.
BSWKIT “Pro”: steel studs, vintage-style mount
The BSWKIT (#3047) is a steel stud (M8 x 1.25 lower thread, M4 x .7 upper) with a separate brass thumbwheel and two 4mm installation nuts. The original bushings are removed. It gives the most ABR-1-like mount of the three, and Faber calls it more difficult to install and recommends professional installation. For the install itself, follow Faber BSWKIT Install. Watch that video before ordering.
What to measure before you order
- Current bridge height at both posts. Measure from the body to the underside of the bridge, or photograph it against a ruler, so you can get back close to your current action.
- Bushing hole depth (iNsert only). After a bushing is out, check that the hole is at least as deep as the iNsert’s 14.0mm (.55″) length below the flange, so the flange can sit flush with the top. A shallow hole is rare. If you need more depth, it is usually only about 1/32″ to 1/16″. Use a 1/4″ drill bit. That bit is smaller than the hole, and the bottom of the iNsert post is narrower than 7mm, so the bit matches that smaller tip. Keep the bit centered and do not let it touch the sides of the hole, or you will widen the hole.
- Tailpiece bushings (Master Kits only). USA-made Gibsons use inch (5/16-24) tailpiece studs. On a Heritage, check whether the tailpiece bushings are imperial or metric before choosing a kit.
Tools and steps
Tools: calipers or a small ruler, a screwdriver, masking tape, a soft cloth, fresh strings, and a tuner. Tone-Lock orders include the Lock Nut/Tailpiece Stud Tool, and iNsert orders include the 5mm bolt and installation tool.
Steps:
- Note your bridge height (see above).
- Loosen and remove the strings. Tape off the finish around the posts.
- Lift off the old bridge and unscrew the one-piece Nashville post/thumbwheels.
- Install your conversion posts. NSWKIT: thread the new posts into the existing bushings. iNsert: thread the included 5mm bolt into the bushing. The bushing’s bottom is hollow, so as the bolt bottoms out on the wood it lifts the bushing out. Check the hole depth, then install the iNsert as shown in Faber’s iNsert video so the flange sits flush. If the hole is a little short, deepen it about 1/32″ to 1/16″ with a 1/4″ bit, kept centered so it does not widen the hole. BSWKIT: follow Faber BSWKIT Install.
- Set the thumbwheels to roughly your old bridge height.
- Fit the ABRN or Tone-Lock bridge with the saddle screw heads facing the pickups. That’s the opposite of how Nashville and Schaller bridges are usually installed. On a Tone-Lock, thread on the lock nuts and tighten them with the tool. Use the unnotched end when the top of the post is below the lock nut slot, and the notched end when the post protrudes into it.
- Master Kit: swap the tailpiece studs for the Tone-Lock studs and spacers, fitting the TP-’59 between the spacer and the stud head. Don’t overtighten.
- Restring, tune to pitch, set bridge height and tailpiece height, then set intonation. If a saddle runs out of travel, don’t force the screw. Remove the saddle and turn it around.
When to see a tech
- A bushing won’t come out with the bolt, or the finish around it starts to chip.
- A bushing is badly stuck, or you are not comfortable deepening a shallow iNsert hole. A slight shortfall (about 1/32″ to 1/16″) can be opened with a centered 1/4″ bit, as above.
- You’re installing the BSWKIT and would rather not follow the install video yourself. Faber recommends professional installation.
- You want saddles notched for a specific string gauge, or intonation won’t settle.
FAQ
Can I put an ABR-1 style bridge on a Gibson with a Nashville bridge?
Yes. The Faber ABRN is an ABR-1 style bridge for Gibson guitars with Nashville bridges and Heritage guitars with Schaller bridges. FaberUSA sells it, like the Tone-Lock bridge, together with conversion posts: NSWKIT, iNsert or BSWKIT.
Why do I have to buy conversion posts with the bridge?
FaberUSA sells the ABRN, the Tone-Lock bridge and Tone-Lock Master Kits only with conversion posts, so the new bridge always sits on matching Faber posts instead of the stock one-piece Nashville posts. You choose the post type based on how much work you want to do.
Do I have to drill my guitar to convert from Nashville to ABR-1 style?
Usually not. The NSWKIT needs no modifications. The iNsert replaces the body bushings and needs a hole deep enough for its flange to sit flush. The BSWKIT is the most involved, and Faber recommends professional installation.
What is the difference between the NSWKIT, iNsert and BSWKIT?
The NSWKIT (E-Z) replaces only the one-piece post and thumbwheel and screws into your existing bushings. The iNsert (Plus) replaces the bushing and post with a one-piece bell brass stud and separate thumbwheel. The BSWKIT (Pro) is a steel stud with a separate thumbwheel for the most vintage-style mount, and Faber recommends professional installation.
Should I choose the ABRN, the Tone-Lock bridge or a Master Kit?
The ABRN is a non-locking ABR-1 style bridge. The Tone-Lock bridge locks to the threaded conversion posts with lock nuts. A Tone-Lock Master Kit adds a TP-’59 aluminum stop tailpiece and Tone-Lock locking tailpiece studs and spacers to the Tone-Lock bridge and posts.
Which way should the saddle screws face after the swap?
Toward the pickups. Nashville and Schaller bridges are usually installed with screw heads facing the tailpiece, but Faber bridges are set up for screw heads facing the pickups, and the saddle orientation is set for correct intonation that way.